CMPS Stops 07
Assigning Students to Stops
TOC
CH1: Compass Basics
CH2: School Management
CH3: Student Management
CH4: Creating Stops
CH5: Vehicle Management
CH6: Generating Runs
Adding new Students to the database is a common event in Compass Routing. Occasionally, a new Stop has to be created to service those Students. In other cases, the Students have to be assigned to existing Stops.
Whatever the case may be, Students always need to be linked to Stops and, depending on the situation, users can follow different workflows to perform this task.
In the Map
Let’s start by assuming that a new Student has been enrolled in a particular School. This Student has to be assigned to a Stop that is close enough to the Student’s residence in order to provide effective transportation service. The Stop will often be an existing one but sometimes it may be necessary to create a new Stop. To review how to do this, read Adding Stops in the Map.
If the Student’s record and the Stop have already been created and added with their corresponding addresses to the database, you can locate the Student and the Stop on the Map. To review how to find Students, read the tutorial Finding Existing Students.
- Selecting Students and Stops
CLICK AND SELECT
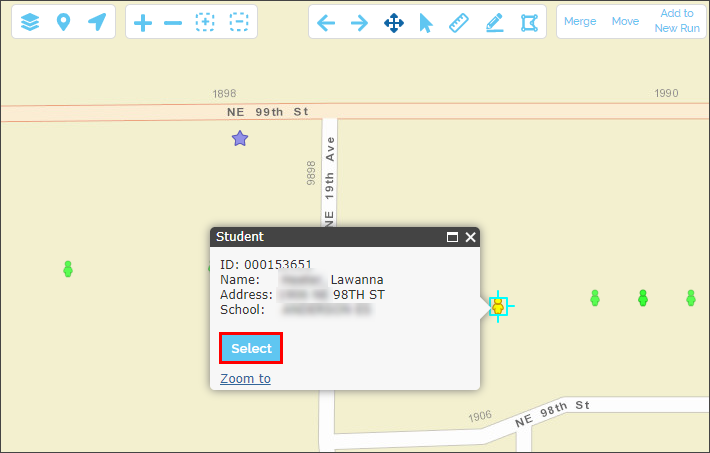
- Select the Student by clicking the icon on the Map. A Student information window will be displayed.
-
Click Select. You’ll notice that the Student icon switches to yellow.
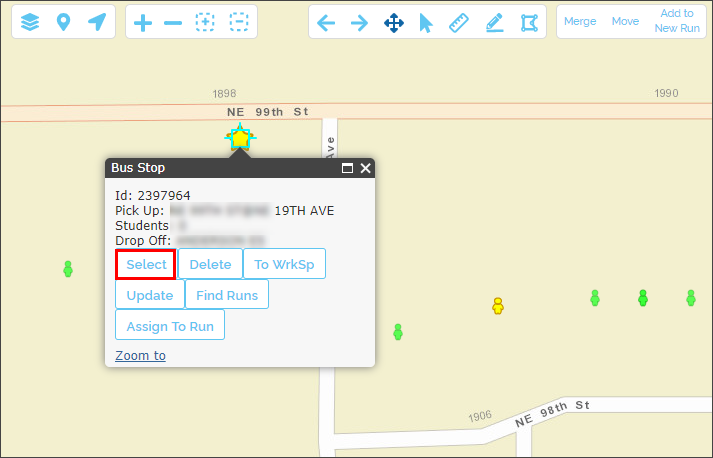
- Select the Stop by clicking the icon on the Map. A Bus Stop information window will be displayed.
-
Click Select. Again, you’ll notice that the Student icon switches to yellow.
USE THE SELECT TOOL
Remember that you can always use the Select Tool to select Students and Stops on the Map faster. To do so:
- Find and click on the Select Tool in the upper section of the Map.
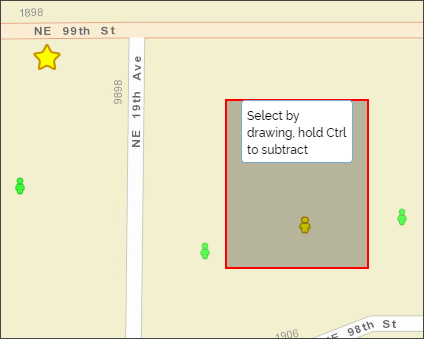
- Click on the map close to the Student or the Stop to be selected and simultaneously drag the cursor from corner to corner to select the Student or the Stop before releasing the mouse button. A selection rectangle will be visible while dragging the cursor. You can also click on the icon and, when the corresponding pop-up window displays, click the Select button.
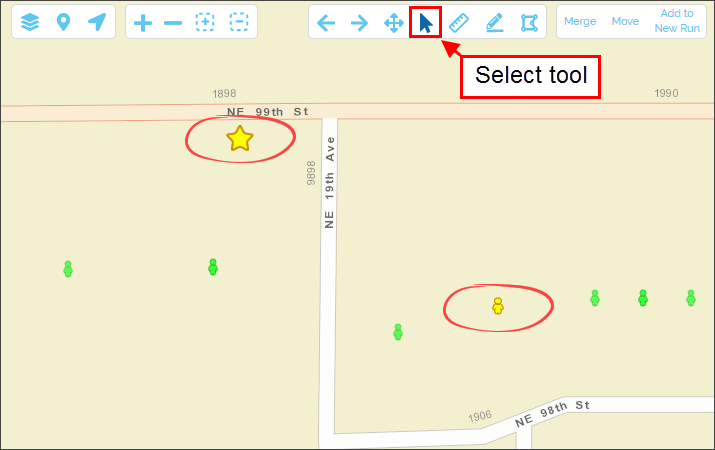
You might need to zoom in first to isolate the Student or the Stop and make the selection easier. The color of the icons will switch from green to yellow on the Map to indicate that they have been selected.
Notice that you can select both (or more, in other cases) at the same time.
- Assigning Students to Stops
Once you have selected the Student and the Stop, proceed to assign the Student to the selected Stop by following these steps:
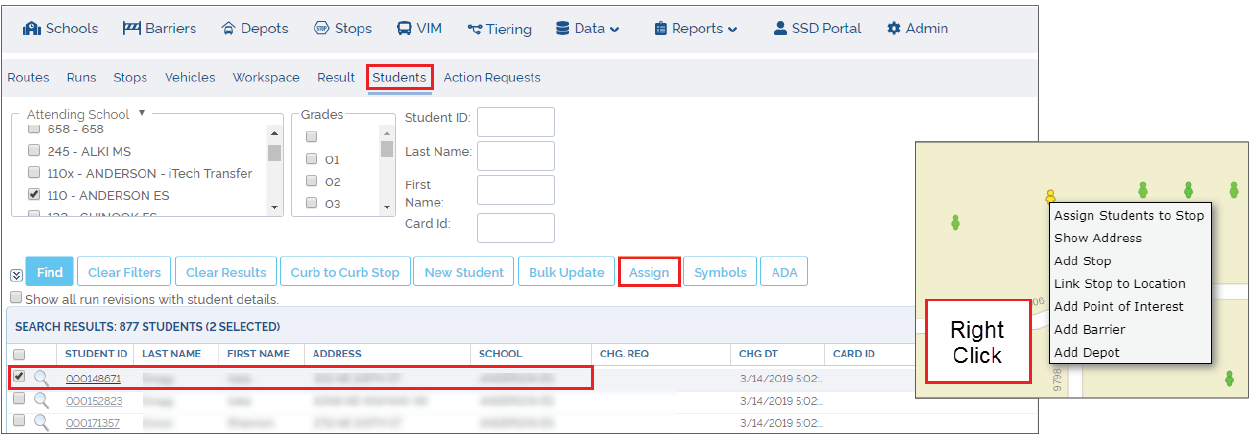
- First, make sure you are in the Student Management Menu. If you are not, click the Students tab to display it.
- Click the Assign button.
- A message will appear at the bottom of the map prompting you to right-click on the Map. Do so (you can click anywhere on the Map).
- When an action selection window displays, click Assign Students to Stop to complete the task.
In the Stop Window
Another way to assign Students to Stops involves using the New or Existing Stop dialogs. But first, users need to create a Stop or find the Existing Stop to which the Students will be assigned.
To review how to create a new Stop, read the tutorial Adding Stops with the New Stop Button. To review how to find an existing Stop, read the tutorial Understanding Stops.
- Selecting Stops
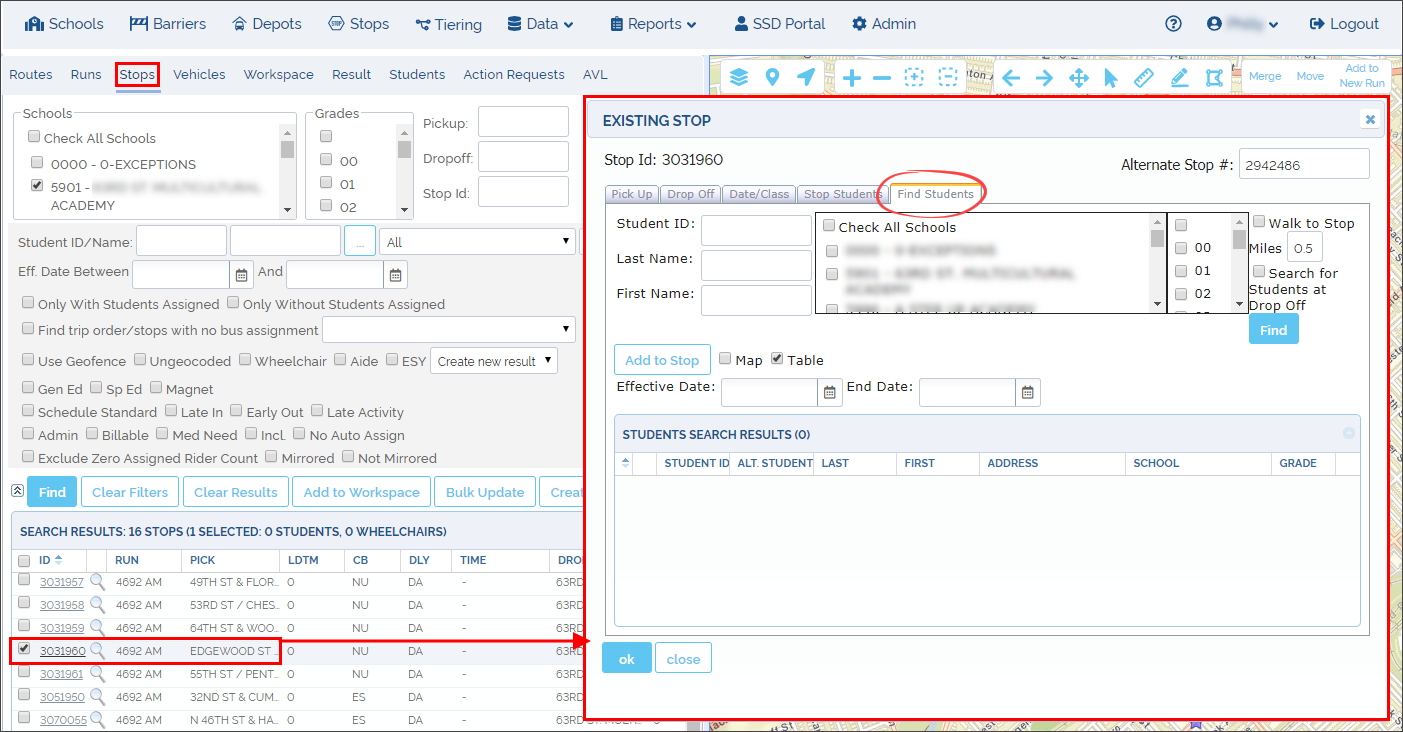
When creating a New Stop, you can access the Find Students menu directly by clicking on its tab. On the contrary, if you have searched for an existing Stop, you will need to select it from the search results list by checking off the box next to it. Then:
- Click on the Stop ID. An Existing Stop window will appear.
- Click the Find Students tab. The Find Students menu will be displayed.
- Finding and Assigning Students to Stops
Depending on whether you have created a new Stop or searched for an existing one, a New or an Existing Stop dialog will appear. These dialogs look identical.
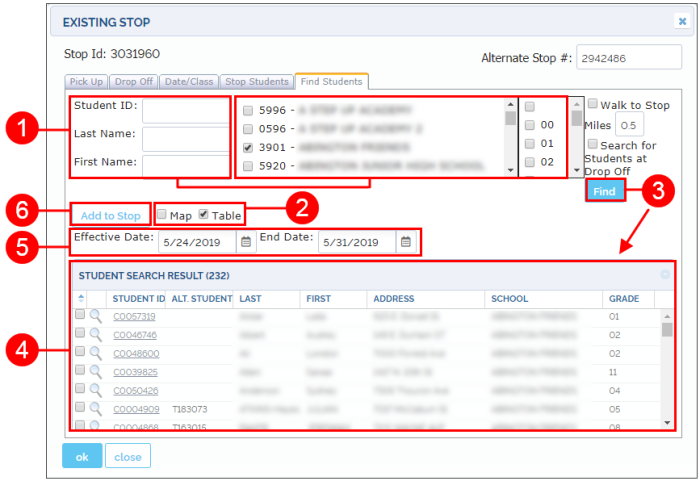
The Find Students tab within these dialogs presents two search options. A first section allows users identify the Student by ID, Last Name and First Name, and a second section provides School and Grade search filters.
A Find button is located on the right of the Grade filter section.
To Find and Assign Students to the Stop from the Find Students tab:
- Enter Student ID, Last Name and First Name if you know them. Otherwise, select the boxes next to the corresponding School and Grade. On the right, you have the option to filter the search by Students who live within the walk to Stop distance or by Students at Drop-off.
- Select the Map or the Table option to display the matching Students as you prefer.
- Click Find. A list with the matching Students will appear in the table below and/or the Map, depending on your previous selection.
- Select the desired Student from the list.
- Once you have selected the Student, enter the Dates when the assignment of the Stop should start being Effective and when it should End.
- Click Add to Stop. A window asking you to confirm this action will pop-up. Click OK to confirm.
- A new window confirming that the Students have been added to the Stop will appear. Click OK again.